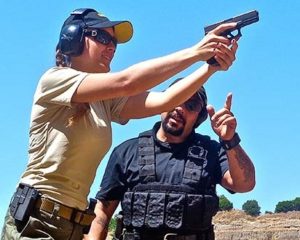
Find a Qualified Instructor
If you’re looking for training, you’ll quickly discover that “instructors” are a dime a dozen. What you may not know is there’s no real standard to measure one against the other.
You’ll find everything from your local NRA Stepford-Trainers teaching a very watered down, politically correct curriculum that’s been technically outdated for over a decade to social-media celebrities who will pitch just about anything to get you to subscribe to their channel or attend their course.

Just to be clear, I’m a card-carrying member of the NRA. I’m glad they’re out there lobbying for our rights. But they really need to up their training game or get out of that part of the business.
I’m also an active follower of many instructors with very successful YouTube channels. But neither an NRA certification nor a large following of subscribers is, in and of itself, any indication of quality or pertinent instruction. Many classes will leave you ankle-deep in brass but come up short on helping you advance your skills.
That’s not to say there aren’t some truly exceptional instructors out there. There are.

But it can be hard, and expensive, to figure out who is and who isn’t qualified to give you the kind of Hand+Gun combatives training we’re talking about.
Equally important is finding an instructor who actually has the teaching skills to convey that knowledge to students who have a limited amount of time and money to put into training.
Let’s be crystal clear. Bad instruction is dangerous!
Why?
This isn’t target shooting, sport shooting, competitive shooting or hunting. This is about the stark reality of how a single person uses their hands and a gun to protect themselves and others against the most common “street” attacks.

Not being trained is risky. But nothing is more risky than thinking you’ve been taught how to protect yourself against a deadly-force attack when you haven’t. It could cost you your health, your life or your freedom.
Over the years, I’ve had the chance to work with and pick the brains of some of the best instructors in the country and a few from other countries. I’ve come up with a list of “common denominators” that you’ll find in qualified instructors that teach sound Hand+Gun principles.
You can use it to interview prospective instructors. Hopefully this will help you find the kind of training that’ll keep you and your loved-ones out of harm’s way.
It’s yours for free. You don’t even need to give us an email address. All we ask is that you use it to make yourself safer, stronger, sooner. Share it with your friends if you’d like. Dig into it. Do your own research. And feel free to call us with any questions that come up.
Hopefully, we can raise the bar, by helping people (including well-intentioned instructors) better understand what Hand+Gun combatives training really is.
The following questions will help you identify some of the key principles of combatives training. Each question has an Expected Response and an Explanation.
The expected responses provide what a qualified instructor who teaches these principles should know. That doesn’t mean they need to give you verbatim answers. The explanations help you understand why they need to know those things.
In addition to helping you find a qualified instructor, the questionnaire itself will give you a solid foundation in advanced combatives.
Where I thought it would be helpful, I included links to blog articles, videos and terms on our glossary page. The more conversational you become on the topic of armed combatives, the easier it’ll be for you to speak intelligently to others about it, develop your own insights and contribute to the community.
I’m not suggesting that someone has to get all 10 questions correct to be a qualified instructor. But in the process of talking through these questions, you should get a good sense of a prospective instructor’s true abilities.
Finally, don’t be intimidated by any high-level performance goals mentioned. I realize everyone has different amounts of time and different levels of interest they’ll want to commit to this type of training. The objective is to get you the best training, that will give you the best outcome, for whatever time you do invest.
Good Luck!
Question 1
What aiming method or methods do you teach in your handgun classes?
Expected Response
If you find the instructor talking exclusively about sights, or asks you what you mean, that’s not a good sign. Any competent instructor should immediately recognize you’re asking about the two main types of aiming: visual aiming and proprioceptive aiming (aka: point aiming, muscle-memory aiming, PEK aiming).
Explanation
Relatively few instructors understand, much less teach, PEK aiming. The average person can be taught to use PEK aiming when shooting from 0 to 12 feet – where the vast majority of attacks come from. PEK aiming is faster, it improves weapon retention and it allows you to protect vital areas of your body while shooting.
Question 2
What distances do you train your students at?
Expected Response
One of the main things you’re looking for the instructor to say is that he or she includes training at zero-distance or near contact ranges. They may not start you at zero distance but they need to get you there relatively quickly.
Explanation
The best responses would be 0 to 20 feet, 0 to 7 yards or 0 to 7 meters because those distances show they understand the statistics of real attacks. (51% come from within 5 ft., 74% from within 10 ft., 87% from within 15 ft., and 93% from within 20 ft.) Training at further distances is fine but the bulk of your training needs to cover those critical ranges first.
Question 3
What do you think of night sights?
Expected Response
Night sights are very popular because of their cool-factor. But in fact, they only provide a limited benefit, because they only work in a few specific environments. There are other accessories you can add to your gun that will give you better performance over a broader range of Low-Or-No light (LON light) environments.
Explanation
Three out of four attacks take place in LON light settings. There are nine different lighting environments. (Relatively few instructors know that.) Night sights only work in two of those environments – and they actually make things worse in three of the other seven. While we’re not against having night sights to help in those situations, for the money they cost, you are much better off starting with a compact gun-mounted light, which is a better solution in more situations. (See our blog article about Shooting in Low or No Light.)
Question 4
What handgun caliber do you recommend? And Why?
Expected Response
Most healthy men and women can use a 9mm handgun effectively, regardless of their size. That’s why most of the law enforcement and military agencies around the world have gone to the 9mm. Its terminal ballistics has made the modern 9mm an effective man-stopper, if you use the right engagement technique. For this question, don’t forget the “Why”. The 9mm is very popular because it’s relatively cheap. You’re really trying to find out if a prospective instructor understands proper engagement technique. Some of which is explained below.
Explanation
After working with hundreds of shooters, I can count the number of people who physically could not handle a 9mm on my fingers. All those cases involved people with diseases such as advanced arthritis or injuries that involved muscle, bone or nerve damage in their hands or wrists. There are many more people who are psychologically averse to the recoil and sound of a 9mm, but many of those same people would be averse to firing any handgun other than perhaps a 22LR.
As for the caliber’s effectiveness, best practices of engagement always promotes shooting multiple, rapid-fire, medium-energy rounds in groups, rather than single, slow-fire, high-energy rounds. (Checkout our blog article: “Terminal Ballistics: The Nickel Tour“.)
While some instructors may prefer the S&W 40 Cal or the .380 Auto calibers for one reason or another and others may argue a 45 ACP is a good choice for In-Home Defense, these are commonly considered as special exceptions to the 9mm rule. (For more specifics, see our blog article: “Resolving the Caliber Debate – Engagement Concepts“.)
Question 5
Do you incorporate hand-to-hand combative techniques into your handgun training?
Expected Response
If he or she says no, our advice is to politely find a way to end the conversation and move on. If they say yes, ask more about what kind of hand-to-hand training they use.
Explanation
Keep two things in mind.
One – This isn’t about whether or not you want to take a course that combines hand-to-hand techniques with handgun skills. If you’re ready for a combatives course (meaning you’ve already learned the basics of shooting a handgun) and your interested in learning how to protect yourself with a handgun, no valid course would teach one without the other. That’s just the nature of managing a deadly-force situation.
Shooting is just one part combatives the same way throwing is just one part of playing baseball.
Two – In deadly force situations, you don’t want to rely on sophisticated martial arts systems, such as Krav Maga, Brazilian Jiu Jitsu or MMA. While these are all excellent approaches to fitness, recreation, sport and general self-defense, they are complex systems. They take a long time to master and with the possible exception of the specific Krav Maga techniques taught to the military inside Israel, none of them truly integrate hand-to-hand and handgun movements in the same techniques.
All that said, if you have the time, money and interest, studying any of those disciplines will only make you a more diversified protector.
For the purposes of choosing a course, we’re looking for instruction that focuses on more primal, simple, abbreviated, limited-decision, counter-offensive techniques.
Finally, the training should have an emphasis on what we know to be, statistically, the most common deadly force attacks. “Know your enemy before he ever sees you.”
Question 6
What kind of weapon retention methods do you teach?
Expected Response
Summarizing an appropriate response to this question is a bit of a challenge because we’re looking for principles, not specific techniques. If you have the time, review our blog article: “Retention Principles – Facts vs Fiction“.
That said, there are a couple of popular but flawed “retention methods” to look out for. If your prospective instructor alludes to any kind of “Slap and Shoot” or “Elbow-to-the-chin/Shoot-Low” techniques, that could be a red flag. Those are outdated techniques seem to linger in our “soundbite” society.
You’re looking for an instructor who talks about shooting from retention with two hands on the gun, and where your support-hand holds and guards the slide portion of the gun.
Explanation
Current best practices for weapon retention promote counter-offensive, rather than defensive, movement. And it’s important to prioritize getting to your gun quickly with both hands to block any attempt from an attacker to get to it first.
Two-hand retention grips are key to guarding and controlling the front half of your gun. There are a handful of different two-hand retention grips. Some include the C-Clamp, the G-Wrap and the Palm-Wrap grips. These grips can be used with guns that do or do not have a Combat Shroud. However, a Combat Shroud will prevent your gun from jamming during all these techniques. That’s important because it eliminates the need to clear and rechamber additional rounds after firing. It also allows you to shoot faster and more accurately with less felt recoil. For more details, go to our blog article: “Pros and Cons of the Combat Shroud in Retention Techniques“.
Question 7
What kind of targets do you use?
Expected Response
This is kind of a fishing expedition. There are lots of answers a qualified instructor might give. What you want to hear is some indication that they use a variety of different targets for a variety of specific purposes, and that they will start training you to shoot on multiple targets relatively soon.
Explanation
The targets you use will determine what kind of sight pictures you will become proficient at shooting. For the most part, bullseye or dot targets are only useful for analyzing a relatively new shooter’s abilities and diagnosing problems.
Most combatives training should be done on silhouettes. This teaches shooters to aim inside boundaries, rather than at pinpoints. Silhouettes with clothing on them make shot-placement feedback much more realistic and photograph targets train students how to look at an attacker during a conflict. Moving targets and 3D targets are excellent. But they’re also extremely expensive, so don’t be surprised if an instructor doesn’t have them available.
One of the most important skills a student must learn is how to shoot on multiple targets quickly. Two-thirds of all attacks come from multiple attackers. Most instructors wait far too long before introducing students to multiple targets, and some never do.
Engaging targets is where everything starts to come together. The two-hand retention grip and PEK aiming, when used with a Combat Shroud is the only combination that allows a relatively inexperienced shooter to fire multiple times on multiple targets at speeds previously only achieved by champion-class competitors. That is not an exaggeration. It’s what makes these techniques so powerful.
Question 8
What accuracy objectives do you set for your students? How will you help us reach those objectives?
Expected Response
Be leery of any instructor who doesn’t have concrete accuracy standards. Responses like “We can only ask you to do your best.” or “Wherever you’re at, we can make you better.” may be politically correct in our participation-trophy culture, but they’re tactically irresponsible. There are two key principles to accuracy: safety and effectiveness. You need to know what is safe and effective, and what it isn’t.
The second question is the acid test . Responses like “Lots of repetition” or “We have drills for that” are way to vague. You need to hear specifics about how they train shooters to be accurate.
Explanation
If you ever find yourself in a situation where a deadly force response is legally and morally justified, there are Three Imperatives of Engagement that govern your actions. (See our blog article: “Examining the Three Imperatives of Deadly Force Engagements“.)
- You DO NOT have the right to cause or allow any injury to innocent bystanders.
- You DO have the right to protect yourself from death or serious injury, except where doing so would conflict with the First Imperative
- You DO have the right to kill or incapacitate any threat that conflicts with the First or Second Imperative.
These imperatives define the Safety Accuracy Standard (SAS). The SAS doesn’t vary. Armed Combatives isn’t a sport where you get classed into beginner, intermediate or advanced groups. No golf handicaps. No racing divisions. The very first time you carry a gun for protection, you’re bound by the SAS.
The SAS can be defined pretty simply: “You are never allowed to miss what is meant to stop your bullet. This insures we never violate the First Imperative and is one reason we train on life-sized silhouette and profile targets. They show us if we’re maintaining the SAS.
But the SAS doesn’t guarantee our shots will be effective for the Second and Third Imperatives. SAS shots can be spread throughout the torso and pelvis, or packed into a baseball-size hole in the sternum. To ensure we can achieve the Second and Third Imperatives, we train to an Effective Accuracy Standard (EAS). And that’s what makes combatives shooting so fun and interesting. Challenging ourselves to see how far and how fast we can shoot as we try to “shoot hardballs”. For more details about the accuracy standards, see our blog article: “Accuracy Standards for Safety and Effectiveness“.
Question 9
What speed objectives do you set for your students? How will you help us reach those objectives?
Expected Response
It’s not that an instructor who claims he can teach you to shoot faster than another instructor is better. It’s about learning how he measures speed and what he does, specifically, to incrementally increase a student’s speed without compromising accuracy or shortening distances.
For increasing your draw-to-first-shot speed, the best instructors work backwards through the Five Step Draw Sequence. First they establish an accuracy baseline when you shoot (Step-5) from a Full-Extension position (Step-4). Then they give you a cadence to go from the High-Ready position (Step-3) to full-extension and firing. Next is to get from the Holster-Cleared position (Step-2) through the rest of the sequence and finally from grasping (aka mounting) the gun (Step-1) in the holster. If you’re not at least somewhat familiar with the Five Step Draw Sequence, this may be difficult to visualize. It’ll become crystal clear if you watch the video: Learning the 5-Step Draw Sequence in One Session.
Split-Time speeds can be systematically increased by breaking down the Trigger Pull and Trigger Reset into two separate Trigger Control drills that progressively merge into one quick, fluid motion that actually improves accuracy.
Also, the use of verbal cadences or a metronome are critical to making rapid improvements. Here again, explaining this in writing makes it sound much more involved than it is. To see the simplicity of these training methods, watch the video: Increasing Speed and Accuracy Through Trigger Control.
Explanation
For the most part the explanation is given above.
However, now might be a good time to make sure you understand that speed is a critical part of effective combative shooting, and not simply because faster is better. Speed actually improves Effective Accuracy and reduces Felt Recoil. This may sound counter intuitive. If so, you may like our blog article: “Resolving the Caliber Debate – Engagement Concepts“.
Finally, any effort to increase your speed will be directly and inversely linked to Mechanical Accuracy and distance. This is a universal truth. Every IPSC World Champion shooter from Ray Chapman to Eric Grauffel will shoot relatively slower at greater distances, because it requires more accuracy.
The key word there is “relative”. Any loss of speed or accuracy for a shooter like Eric Grauffel, at the longest distances, would certainly a fraction of what they’d be for you or me.
In short, as combative shooters, we need to master Safety Accuracy Standards and Effective Accuracy Standards (which, by the way, are different from basic or Mechanical Accuracy) and those standards are inextricably tied to speed.
Question 10
What gun safety rules do you teach?
Expected Response
I saved this question for last because it’s a bit longer than the other questions. So if you’re out of gas, you’ve got nine questions you can use. I considered using a shorter question, but if you dig through it, the information in this question will give you enormous insight as to the difference between a Marksmanship Instructor and a Combatives Instructor.
Explanation
The Combative Safety Rules are very specific. They address two types of safety. Safety against you mishandling a firearm, and safety against an attacker’s threat. Marksmanship safety rules only address the first of those two.
Unfortunately, many instructors still subscribe to an outdated set of rules that are more appropriate for range shooting, competitive shooting or hunting.
The the original rules were codified by a legend in the firearms industry, Colonel Jeff Cooper. To many, these rules are almost sacred and to challenge them is heresy. So I’m going into a bit more detail, not only to help you understand them, but also to ensure you will be confident in their legitimacy as you interact with people (especially instructors) who may challenge anything but the original rules.
Cooper’s Rule #1 – All guns are loaded.
That may be a safe assumption to make if you’re going to shoot at the range, but it’s not the mindset you need as you prepare for the street.
No soldier would head onto a battlefield and no cop would go out on duty assuming their gun is loaded. They would check to make damn sure it’s loaded. The same applies to concealed carrying civilians.
I’m confident that wasn’t the Colonel’s intent. But decades after he penned these rules, no one is asserting the tactical safety risks of not knowing (versus assuming) the status of your gun at all times, in all situations.
Combative Safety Rule #1 – Always confirm the status of your gun is appropriate for your intended use.
Cooper’s Rule #2 – Never point your gun at anything you do not intend to destroy.
Again, great for a range rule, oversimplified for the street.
It is not unreasonable to imagine a street situation where the lesser of two evils is your only choice. For example, if your only solution for stopping an active shooter who is threatening several people is to quickly sweep your muzzle past an innocent bystander, that could be the right choice.
We don’t encourage it. We look for every opportunity to avoid it. We never take it lightly. But we don’t categorically reject it either.
Combative Safety Rule #2 – Never point your gun at anything you can’t justify putting at risk.
Cooper’s Rule #3 – Keep your finger off the trigger until your sights are on the target.
I actually heard Col. Cooper contradict himself on this. He stood in front of a class and said “As I start to raise my gun, I move my finger to the trigger, so I can break the shot as soon as it gets on target.”, which makes total sense.
Now might be a good time point out the difference between a defensive and a counteroffensive mindset. The term “defensive handgun” is a terrible mischaracterization. Nothing we do in Armed Combatives, our posture, our thinking, our movement, or our gun management, is defensive. Everything must be either be directly or indirectly counteroffensive in nature.
This doesn’t mean we’re always shooting. In fact, there are times when not shooting is the best way to create counteroffensive momentum. It means in any engagement we are trying to take the initiative away from our attackers.
We’ve just scratched the surface here. This is a critically important concept. For more details, look at our blog article: Taking the Attacker’s Initiative – Tactical Doubling.
Combative Safety Rule #3 – Keep your finger off the trigger until your gun is properly oriented for counteroffensive purposes.
Cooper’s Rule #4 – Be sure of your target and beyond.
It is almost a foregone conclusion that if you are ever forced to shoot, you could, in all likelihood, have friendlies between, around or behind you or your attacker.
We need to not only be aware of where we’re shooting, but also of where we are drawing fire to. We try to ingrain this in our students by adding to Col. Cooper’s original verbiage.
Combative Safety Rule #4 – Be aware of what’s at and around you and your target, beyond you and your target and between you and your target.
Conclusion
I hope you can see the significant differences in these two sets of rules. This isn’t about splitting hairs or change for the sake of change. It’s about a different type of awareness the street requires.
If you don’t hear these differences in your conversations with prospective instructors, you’re probably talking to a Marksmanship Instructor not a combatives instructor.
I encourage you to memorize these rules verbatim, examine what they mean and apply them to how you carry yourself and your gun.
For an even deeper discussion about the Combative Safety Rules, checkout our blog article: Who Dares Challenge Cooper’s Safety Rules.